My first sewing machine was given to me by my Mum. I say given, but initially I think it was a case of ‘borrowing it to try, and see how you get on…’. I then got on quite well and it became mine!! It’s a Singer machine and I still get it out now and again to sew with. There’s something about old machines that just feel lovely to sew on! My parents then bought me my first machine for a birthday present probably about 5 years ago. I do remember feeling a little overwhelmed at the choice available and wanting to make the ‘right’ decision due to the costs involved and knowing that it needed to last quite a long time. I also have to confess to being swayed by the machine that had the heart embroidery stitch on it – I mean who could resist that??!!! Last year I decided to upgrade my sewing machine and also fell in love with a vintage Singer sewing machine I found in a charity shop, so my collection of sewing machines is ever growing!!
I get asked quite a lot about what to look for when choosing and buying a machine and having been through the process twice now I know how difficult it can be to know where to start. I therefore thought I would compile my top 10 tips for buying a sewing machine so fasten your seatbelt, here we go…!

1. Try before you buy
If you are thinking about learning to sew or if you fancy dipping your toe in the water, I would recommend not jumping in and buying a machine straight away. Is there one that you could borrow to try? Why not take a sewing machine class to try a machine out see if you enjoy it? Once you are sure that sewing is something that you would like to do then that is the time to think about buying a machine.
No matter how many features you want from a machine, my biggest piece of advice is to do your research (if you’re reading this blog post you’re well on your way!!) and try before you buy. Buying a sewing machine is an investment and you want to make sure you are buying the right one for you. For my most recent sewing machine upgrade I narrowed my selection down to 2 machines. It was invaluable to be able to try out both machines and compare them side by side. You may be surprised by which one you prefer. It’s a bit like driving a car – each model has a different feel to it that you can’t tell by just looking at it.
Most sewing machine shops will be happy to arrange a demonstration but you may need to book an appointment in advance to ensure they have the staff available. Some online shops also offer the service of trying a machine out if you visit their warehouse – it’s always worth asking.
If you have the opportunity to try out a machine, try out a few stitches and have a look at them. Have a go at threading it. Pick the machine up – how heavy is it? If you’re going to want to transport your machine around or even carry it around the house, you don’t want to be breaking your back in the process!
2. Buy the best you can afford
It’s not all about the price of the machine as more expensive does not always equal better but you don’t want to outgrow your machine too soon. Think of what features you need from a machine right now and then think what would be nice to have in the future. You don’t want to buy a machine that you outgrow in a year or 2 because you’ve found you’ve reached the limit of its capabilities. Some starter machines for example can seem a good option in terms of price but some of them can only cope with lightweight fabrics and you can’t change the presser feet so even inserting a zip will be very difficult.
If you can’t afford a brand new machine why not look at second hand models. There are usually machines being sold on auction sites such as eBay , on local Facebook selling pages and in charity shops. Try and look for one that you know is in good working order and that has a manual. Lots of manuals are available online now so that may be an option if it doesn’t have one.
3. Automatic needle threader
When I demonstrate the automatic needle threader on the machines in my workshops, there are literally gasps of wonder from people as they witness the marvel that is the automatic needle threader!! Many people struggle to thread the sewing machine needle due to eyesight issues or the fine dexterity needed. Bring on the automatic needle threader! It can be a bit tricky to figure out at first and it’s not for everyone, but once you get the knack it only takes a few seconds to thread the needle. An absolute must in my book! If you don’t have one on your machine then why not contact your sewing machine supplier and see if one can be fitted retrospectively.
4. Adjustable speed control
The ability to be able to adjust the operating speed on your machine is really useful. When you are learning to sew, having the option to reduce the speed can be really beneficial in building confidence. It can be quite scary when it feels like the sewing machine is running away from you! I also like to reduce the speed when doing appliqué or other techniques and elements that require a bit more accuracy. When children are learning to sew, this is really useful too. On the other hand if you are more confident and are sewing long seams, the ability to sew at faster speeds has it’s obvious advantages!!
5. Don’t be persuaded by lots of different stitches
Ooh….shiny, oooh new, oooh 300 stitches!
Been there, done that! Remember the heart embroidery stitch I mentioned before?!
Some machines have hundreds of stitch options. This may look like an attractive feature but seriously think about whether you will use them or not. If you think you will then sure go for it, but I think a lot of people probably won’t need all that many and it would be worth concentrating on some more frequently used useful features instead.

6. Twin needle function
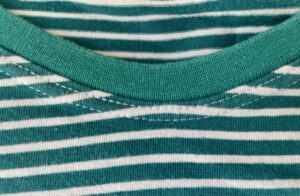
A twin needle is exactly that – a sewing machine needle that has 2 needles side by side. There are several uses for a twin needle; one of the main uses being when sewing with stretch/jersey fabrics. You can use the twin needle to produce 2 parallel rows of stitching around the neckline, hem and cuffs of jersey garments to give them a more professional/ready to wear feel and look. It incorporates a zig zag stitch on the reverse of the 2 rows of stitching in order to allow the stitches to stretch without breaking. In order to use a twin needle your machine needs to have the ‘twin needle facility’. There will be a hole on the top of the machine for an extra spool pin (which will come with the machine) in order to put your second spool of thread on (or you can use a bobbin).


7. One step buttonhole
A lot of modern sewing machines have the facility to sew a buttonhole in one step, to the exact size of the button you are using. All you have to do is follow a few steps to tell the machine what to do including using a special buttonhole foot where you insert the button.


Once you are ready, you line the fabric up and put your foot on the presser foot, keep going until it stops and hey presto a perfectly sized buttonhole for your button! You then carefully cut into the centre of the buttonhole to form the buttonhole.
If you don’t have this one step function it is much more time consuming to sew a buttonhole so this is a definite must feature in my book!
8. Free arm for circular sewing.
If you are sewing anything in a circle like a bag, sleeve or cuff, trouser leg hems, it is really useful to be able to remove part of the machine to reveal the free arm. This allows you to place the tube of fabric around the free arm so that the part you are not sewing at the time, goes right underneath the machine with no risk of getting caught up in the sewing. You then sew, feeding the fabric through and you end up sewing in a complete circle, finishing off where you started (hopefully in exactly the same spot!!)
If you’re like me and are often sewing on an evening, a built in light for the machine is a fantastic feature. It’s not just in the evening though, the light will be so useful to help light up the sewing area at any time of the day. This is also particularly helpful if your eyesight is not so good as it will help you significantly when performing techniques like threading the needle.
10. After sales support/warranty
I would always recommend buying from a company that will offer good after sales support. There may well be the occasion for you to contact them if something isn’t quite right or if you need advice on the machine.
So there you have it – my top ten tips for buying a sewing machine including some must have features. It’s an exciting process but not one to be rushed, so take your time, talk to people and definitely try some out to help you make your decision.
Happy sewing!!


