You know one of those jobs that you’ve been meaning to do for ages and never get round to it? Maybe it’s just not exciting enough and gets pushed down the to-do list. Or maybe you haven’t got the right materials for the job. Well for me, this project was a bit of both!
The project
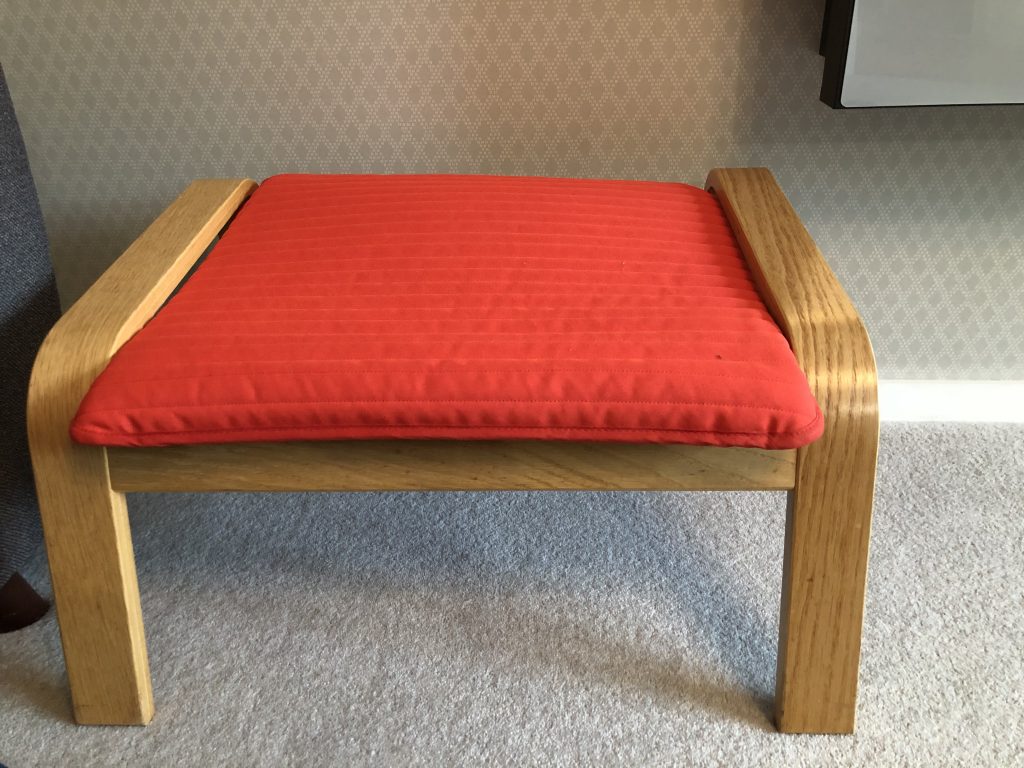
I think most people have or have had the infamous IKEA poang chair at sometime in their life and maybe even the footstool to match! Well the cushion cover and pad that went on our footstool got so dirty and stained that a machine wash just didn’t sort it. I bought a new cushion cover and pad as a replacement but when I got home I realised the shades of red were different – the new one was slightly orangey. This definitely would not do!!

Instead of taking it back I decided to make a new cushion cover – if you’ve got the skills then this is an obvious choice!! I spent ages looking out for a suitable fabric but getting the right shade of red was proving tricky. I therefore decided to go for grey as the colour scheme we have is red/grey. The fabric I found just happened to also be from IKEA!
When making a replacement cover, you don’t really need a pattern to follow, you just need to look at what is there already, try and figure out how it is constructed and replicate it – there’s no point in reinventing the wheel!

On the underneath side of the cushion is the zip closure to allow the cover to be taken off for washing and a strip of Velcro which sticks to Velcro on the footstool to help stop it from slipping. I decided to use these instead of buying new ones as I was going to be ripping it apart anyway and I knew they were the right size.

The edges of the cushion were held together by bias binding (strips of fabric cut on the bias). This isn’t necessarily an essential component to the cushion but I rather liked it so decided to keep that as a feature in my new one. You can also see that the top part of the cushion is quilted with the horizontal lines of stitching across. They had used a layer of wadding underneath the red material so had quilted the layers together which you could try and replicate but I decided not to do that and keep it simple!!
Where to start
The first job was to deconstruct the cushion cover to see exactly how it was made and what pattern pieces were used so that I could trace them out of my new fabric. Stitch unpickers at the ready!! You might find it helpful to take pictures of the cover before you deconstruct it so you remember what it looked like before!

The zip that was used was obviously cut off a roll of continuous zipper tape as there were no stoppers at the upper or lower end of the zip. It was really important to sew new stoppers in as soon as possible as the last thing you want is the zipper pull flying off the end (it is possible to get it back on but it’s a right royal pain!! Best avoided!) If your zip has nylon teeth then all you do is simply sew back and forth over the zipper teeth to create a stopper (you can also use a zig zag stitch). Do not use this method if the teeth are metal! At the bottom end keep the zip together but at the top end sew across each side of the zip separately.


Cutting your fabric out
Next place the cushion pieces which are now effectively your pattern pieces onto the wrong side of your fabric and draw around. Make sure you open the seams out and flatten them so you are including the seam allowances at all of the edges. Then cut out.


All cut out and ready to go! The first sewing step is to insert the zip.
It’s easier to finish the raw edges of the fabric along the edges where the zip is to be inserted before inserting the zip. I did this using the overlocker but you could use pinking shears, zig zag stitch or an overcast stitch too – it’s to stop the edges from fraying. Make sure it’s the straight edges you do, not the curved outside edges.

Inserting the zip
Next place the zip face down on top of the smallest pattern piece (right side up), lining up the top edge of the zipper tape with the finished raw edge of the fabric. Clip or pin in place.


Next using the zipper foot on your machine, line up the edge of the presser foot with the side of the zip teeth and sew the zip to the fabric. Top tip….In order to avoid a bulge where the zipper pull is, don’t try and sew along side it. Instead move the zipper pull down initially out of the way, sew up to an inch or so away from the pull, leave the needle down in the fabric, lift the presser foot up and wiggle the zipper pull up past the presser foot. Once it is clear of the presser foot you can lower the presser foot and continue sewing. This can be a little tricky but it avoids that unsightly bulge when trying to sew past the pull and not managing it!! Just remember to leave the needle down so you don’t lose your place.

Next, keeping the flap of fabric that you have just attached to the zip out of the way, place the zip face down onto the larger back piece, lining up the edge of the zip with the straight edge of the fabric and clip or pin in place. The zip pull will be to the opposite side this time. Sew in place using the same technique as before.


Open the fabric pieces out and using the standard presser foot, top stitch down either side of the zip. Make sure that the underneath side of the zip and the seam allowances are flattened out so they don’t get caught up in your top stitching. I like to line up the edge of the presser foot with the side of the zip teeth and move the needle across to the left but it depends on where you want your top stitching to be.


Next unpick the Velcro strip from the original cushion and line up in exactly the same position onto the new cover. Stitch round all 4 sides of the Velcro.

If you don’t want the bias binding flat piping round the edges of the cushion, what you would do at this point is place the front and back pieces right sides together, open up the zip to at least half way, clip or pin round all 4 edges and sew together. Then turn the right way out and you’re done!!
I however, wanted to replicate flat piping round the edges – I think piping gives it a really professional finish. It is flat piping as there is no cord inside it, it’s just bias binding folded in half. The original bias binding was the wrong shade of red. I could have used shop bought bias binding but I had enough spare grey floral fabric to make my own. Wow – how to do make your own I hear you ask??
Making your own bias binding
Firstly take a corner of the fabric and take it diagonally so that the 2 edges are at a right angle. Then press in place with an iron. This allows you to find the bias grain which is at 45° to the warp/weft grain i.e. the vertical and horizontal grain. Fabric along the bias grain has the greatest amount of stretch. In order for the binding to neatly go around curves and corners, it needs to be cut on the bias. Then measure from this line the width of bias binding you want and cut into strips. In my case the width was 1¾”.


To join strips together, place 2 strip ends RST (right sides together) at right angles and sew diagonally as shown below. Trim the triangle off to leave a ¼” seam allowance and press the seam open. Neat huh?


I then used a bias tape maker for the next step, which once you’ve got the hang of it, makes it really easy and less fiddly to transform your strip into bias binding. This one is from Clover.


- Cut one end of your strip on the diagonal
- Feed the strip through the channel at the bottom of the bias binding tool with the wrong side facing up. In order to feed it through you may need to use a pin to help drag it through (on the underneath side of the tool there is a gap where you can poke the pin through)
- Pull the strip out carefully so that the edges of the strip are curled in towards the centre
- Pin the end of the strip in place
- Using the tip of the iron, press the edges so they are folded in. Pull the bias binding tool away gradually and keep ironing until you reach the end.
- There you have your very own bias binding!!
Attaching the binding to the edge
Before we can sew the bias binding around the edge, it is easier to sew the 2 open ends of the zip together. Open the zip part of the way and then sew across the open end of the zip.

Next, place the front and back pieces together WST (wrong sides together) and line up around the edges. Starting at the centre of the back edge, fold the bias binding in half and wrap around the raw edges so that the raw edge is pushed right up to the centre fold of the bias binding. Pin or clip in place.


Allow enough length of binding so that there is an overlap by an inch or so. It should then look like this.

Next sew close to the inner edge of the binding. You must make sure that you are catching the underneath half of the bias binding too (but don’t worry if you miss a couple of areas – I did. You can always hand sew those bits after). When you nearly get back to the start, an inch or so before the end, fold under the raw edge of the end of the strip and sew in place so you get a neat join.

The finished result
So there you have it – the finished cover!


New cover (bottom)
I even had enough fabric leftover to make 3 matching cushion covers!!! Result! Not bad for 2m of fabric that cost £16!!

Note: The Clover bias binding tool was sent to me to try. All opinions expressed are completely honest and entirely my own.


BRILLIANT !!!!!
Thank you, I was very pleased with the outcome! 🙂
I attempted a slipcover for a kids’ Poang chair and messed it up pretty badly (ended up just dyeing the fabric a new shade and ironing on a big patch/decal). But this tutorial inspired me and came in handy as we just picked up a pre-owned (and very badly sun bleached) Poang footstool. Took me a few hours, but your instructions were clear and easy to follow. Haven’t decided whether I’ll add the bias binding, but am already very pleased with the new cover. Thanks so much!!!
Thanks for your comment and I’m so pleased that the tutorial was useful to you. It’s amazing how a new lease of life can be given to pieces of furniture by doing a few simple changes. 🙂
Thanks for this I also bought the red but really it’s orange one but have now covered it to match my cushions
You’re welcome! Glad you found it useful!